
Group recording lets you record an audio podcast episode with co-hosts and guests by simply using the Podbean app. You can invite up to eight guests to join you during your recording. Once completed, you’ll receive both a single mp3 cloud recording for your whole session, as well as individual local recordings of you and each of your co-hosts. Traditionally, the sound quality of each host and the overall recording in a remote interview or virtual recording decreases due to network issues. Podbean’s Group Recording function allows you to get clear, high quality individual recordings of each host, as these recordings are recorded locally on each host’s smartphone. Your co-hosts recording audio quality is not affected by the internet connection. After the recording session is completed, you can get each speaker's local audio recording in your Podbean account media manager and merge them into a master file using your DAW audio software of choice.
Before you begin, please ensure that you and every host have the Podbean App installed on their phones and that you and your guests have created a Podbean account and have logged into the App. Also for the best experience and audio quality, it’s recommended to use headphones and a mic during the group recording.
Time To Learn How To Use Group Recording
1. Create Group Recording
Log into your Podbean account, click on the “+” icon at the bottom–>click Group Recording . Enter your session title, click Start Now to start your group recording. You can also schedule your group recording for a later date by choosing the Start Time, and you can navigate to Profile -> Recording -> Scheduled Recording to see your upcoming show.

2.Invite Co-hosts
You can add your co-host’s email and click the invite button to send an email invitation to your guest. They will receive an email with a link to your group recording. If they do not have the Podbean app installed on their device, clicking the link will prompt them to do so before the group recording. You can also click the copy button next to the group recording link to share it. If you’ve previously invited a guest, you can click the green invite button next to their name to invite them to the group recording.

3. Record Audio
When you’re ready to start your group recording session, click the red Record button.
Podbean Group Recording mobile interface:
- Press the Chat button to open up the keyboard. You can type messages to your listeners. They can also type messages to you during the group recording.
- Press the microphone button to mute yourself during the recording.
- Click the pause button to pause your group recording. You can click the record button again to resume the recording. The recording will pick up right where the pause button was pressed.
- To invite a co-host after the record session started, you can press on one of the grey call in avatars at the top of the screen. You should have all of the previous options available from earlier for inviting your co-hosts.

4. End Recording
To end your group recording, click on the power button at the top right corner, then click End .

5. Upload Recording
On this screen, each host will be asked to not close this screen until their recording has been uploaded. This is important, please remind all cohosts do not close the screen or app till they see the “Success” message. Otherwise, you won’t be able to get cohosts’ local recordings. Once their local recording has been uploaded, each host should see a green SUCCESS circle. They may then close their app.

6. Get Recording
You will get two kinds of recordings after you finish the group recording. One is the group cloud recording file available in the app right after recording, the others are the single track master files recorded individually to participants’ phones that are available for future editing.
-
To review the cloud recording, you can go to the profile page–>My Recordings. This is the recording that has all co-hosts merged into one file.

-
To access individual co-host tracks, log into your Podbean
account on your computer.
- Click on Podcast Dashboard .
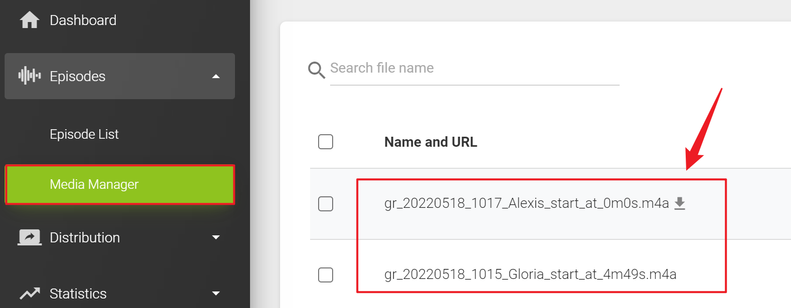
- On the left hand column, click on Episodes - Media Manager .
-
Click the
Download
icon to download the separate audio tracks of each
speaker.
- The file name for each co-host consists of gr (which stands for group recording), recording date, nickname of the speakers and the time spot when joining the session.


Once you download the individual host recordings, you can place them into your DAW or audio software of your choice such as GarageBand or Audacity. Since each host recording doesn’t include any of the other speakers, you can edit each file before creating the final one. This is a great way to adjust the audio levels of each participant, add effects to each track, and more. Once you’ve created the final bounced file, you can upload that track to Podbean.
Get your free recording app today!

